rose photography: Timeless Beauty and Delicate Charm
Introduction
Roses have always fascinated photographers with their timeless beauty and delicate charm. As an enthusiast and advisor in the world of rose photography, I am here to guide you through the challenges and share tips for success in capturing stunning images of these magnificent flowers.
Understanding Rose Photography
Before delving into the techniques, it’s essential to understand the unique characteristics of roses. These flowers symbolize love, passion, and beauty, making them a popular subject for photographers seeking to express emotions through imagery.
Choosing the Right Equipment
To capture the intricate details and vibrant colors of roses, having the right equipment is crucial. While a dedicated camera with manual controls is ideal, you can achieve remarkable results even with a smartphone. However, investing in quality lenses and accessories specifically designed for close-up and macro photography will greatly enhance your capabilities.
Lighting Techniques
Lighting plays a pivotal role in rose photography. Natural light, especially during the golden hours of sunrise and sunset, can create a soft, warm ambiance that complements the beauty of roses. Experimenting with diffused light, backlighting, and artificial lighting techniques such as using a reflector or softbox can further elevate your images.
Composition and Framing
To create visually pleasing photographs, mastering composition techniques is essential. The rule of thirds, leading lines, and the use of negative space can help you create well-balanced and captivating compositions. Don’t be afraid to explore different angles and perspectives to add depth and visual interest to your images.
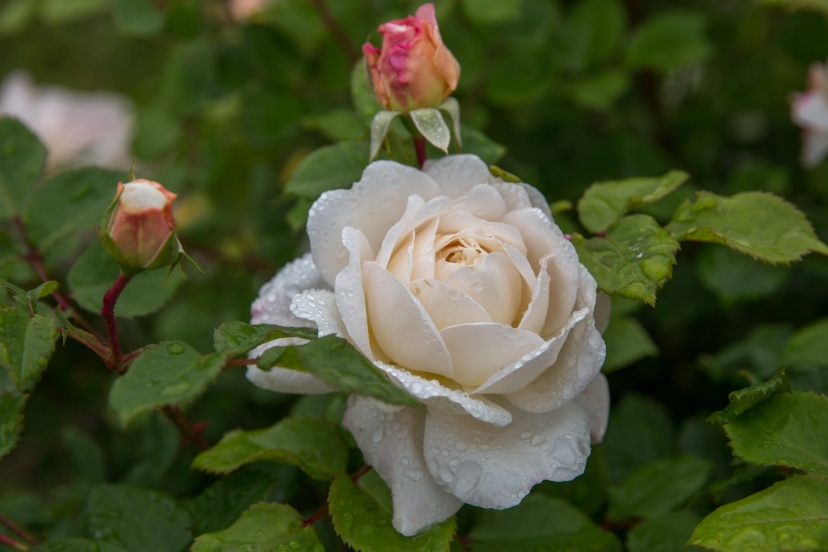
Capturing the Beauty of Rose Details
Roses are known for their intricate details, and macro photography allows you to capture these mesmerizing aspects up close. Use a macro lens to focus on the delicate textures, mesmerizing petals, and captivating patterns that make each rose unique. Experiment with different depths of field to create a soft, dreamy effect or highlight specific details.
Overcoming Challenges
Rose photography comes with its fair share of challenges. Limited depth of field can make achieving sharp focus throughout the image a bit tricky. Using a smaller aperture and focusing precisely on the desired area can help overcome this challenge. Additionally, managing reflections and glare from the glossy petals requires careful positioning and the use of diffusers or polarizing filters.
Tips for Success in Rose Photography
1. Patience and observation: Take the time to find the perfect bloom and observe the way light interacts with the rose.
2. Tripod stability: Utilize a tripod to ensure sharpness and stability, especially when shooting close-ups or using slower shutter speeds.
3. Experiment with angles: Explore different angles and perspectives to add variety and interest to your shots.
4. Embrace negative space: Leave space around the rose to create a sense of elegance and simplicity in your composition.
5. Be mindful of the background: Ensure the background complements and doesn’t distract from the main subject.
Editing and Post-processing
Post-processing allows you to refine and enhance your rose photographs further. Adjusting colors, contrast, and saturation can bring out the natural beauty of the roses. Removing distractions or imperfections can help create a clean and polished final image. However, remember to maintain the authenticity and integrity of the original scene.
Showcasing and Sharing Your Rose Photography Work
Once you have captured stunning rose photographs, it’s time to showcase and share your work with the world. Building an online portfolio or gallery can help you gain recognition and connect with fellow rose photography enthusiasts. Engage with the community, participate in competitions, and seek feedback to improve your skills continuously.
Conclusion
Rose photography is a captivating journey that allows us to appreciate the delicate beauty of these magnificent flowers. With the right techniques, equipment, and a keen eye for detail, you can create stunning images that convey the essence and emotion of roses.
Rose Photography FAQs
1: What is the best time of day to photograph roses?
The golden hours of sunrise and sunset provide beautiful soft light that enhances the colors and textures of roses. However, don’t limit yourself to specific times of the day. Experiment with different lighting conditions and observe how the rose transforms under various natural and artificial light sources.
FAQ 2: How do I achieve a blurry background in rose photography?
To achieve a blurry background, also known as a shallow depth of field, use a wide aperture (smaller f-number) on your camera. This creates a narrow plane of focus, keeping the subject sharp while blurring the background. Position yourself close to the rose, use longer focal lengths, and maintain an adequate distance between the subject and the background.
FAQ 3: What camera settings are recommended for rose photography?
While the ideal camera settings may vary depending on the specific conditions and desired effects, starting with an aperture around f/4 to f/8, a shutter speed that eliminates camera shake, and an ISO setting that maintains image quality is a good baseline. Adjust these settings based on the available light and the creative vision you have for your photograph.
FAQ 4: How can I enhance the colors of roses in post-processing?
In post-processing, you can enhance the colors of roses by adjusting the white balance, saturation, and vibrancy. Use selective editing tools to target specific colors or areas within the image, allowing you to bring out the natural beauty and richness of the rose’s hues.
FAQ 5: Are there any special considerations when photographing rose gardens?
When photographing rose gardens, respect the environment and follow any guidelines or restrictions set by the garden authorities. Be mindful of other visitors and avoid damaging the plants or disturbing the ecosystem. Remember to ask for permission if you plan to use your photographs for commercial purposes or publish them in any way.
Further reading
Check out our other relevant articles:
Art of Portrait Photography: Master Techniques for Stunning Shots
.