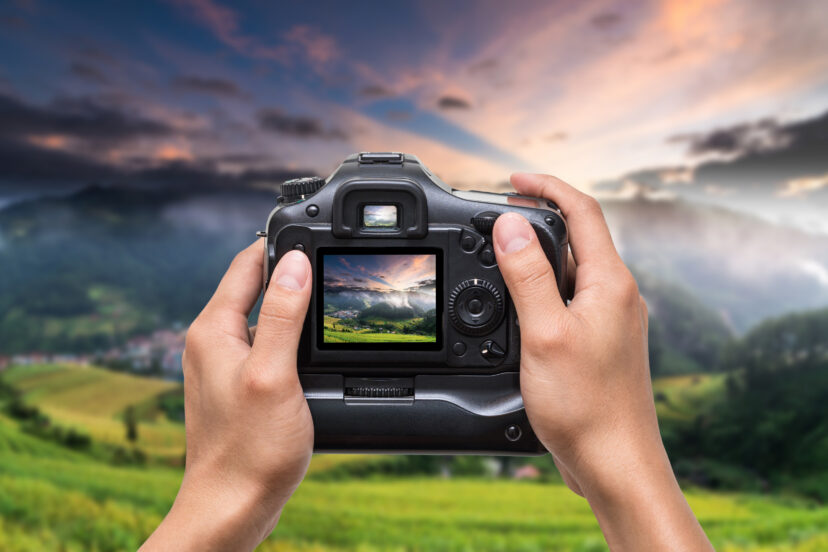
How to Shoot in Manual Mode on DSLR (Full Tutorial)
How to Shoot in Manual Mode on DSLR (Full Tutorial)
Why I Teach Manual Mode
Let’s face it—Auto mode is fine when you’re starting out, but it doesn’t give you full control. Learning how to shoot in manual mode on DSLR gives you creative freedom, better control in tricky lighting, and a significant edge in your photography game.
I still remember the day I switched to manual—it felt like unlocking a secret level in a video game. Suddenly, I was telling the camera what I wanted, not asking it to guess.
Switching Your Camera to Manual Mode
Mode Dial Setup
It all starts here. Look for the Mode Dial on your DSLR—turn it to “M” for Manual. That’s your new playground!
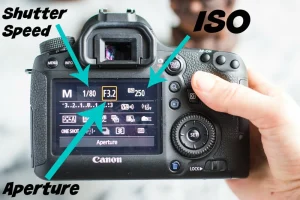
Aperture, Shutter Speed & ISO: The Exposure Triangle
These three work together to control exposure. You can’t master manual mode without them.
What is Aperture?
Aperture is like the eye of your camera. The wider it opens (lower f-number like f/1.8), the more light it lets in—and the blurrier your background gets.
What is Shutter Speed?
This controls how long your camera’s sensor is exposed to light. Use a fast shutter (like 1/500s) to freeze motion. Use slower speeds (1/30s or less) to let in more light or create motion blur.
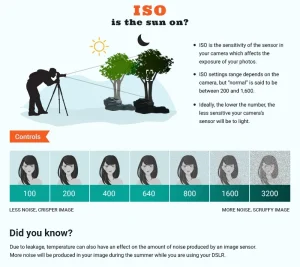
What is ISO?
ISO is your camera’s sensitivity to light. A low ISO (100–200) keeps images clean and crisp. A high ISO (800–6400) works in low light but can add grain or “noise.”
Balancing Settings for a Well-Exposed Shot
Exposure Meter and Histogram
Your camera’s exposure meter helps you balance the triangle. Check the histogram on your screen—it should be balanced, not too far left (underexposed) or right (overexposed).
Step-by-Step Workflow for Manual Mode
Let me show you how I set up every manual shot:
1. Set ISO First
I start with ISO. If it’s a sunny day, ISO 100–200 is perfect. Indoors or at dusk? Maybe ISO 800–1600.
2. Choose Aperture
What kind of depth do you want? f/2.8 is awesome for portraits, while f/11 is great for landscapes.
3. Adjust Shutter Speed
Now tweak the shutter to get your exposure meter balanced. I adjust it last—faster for action, slower for more light.
How Focus, Aperture and DOF Interact
Use Focus Peaking or Live View
Your focus point and aperture work together to control depth. Use focus peaking (if available) or Live View to get razor-sharp focus—especially at wide apertures like f/1.8.
Tools to Guide Manual Exposure
Use your camera’s histogram, light meter, and exposure warnings (like “blinkies” for overexposure) to judge your scene. A handheld light meter also helps in weird lighting.
Shooting in Bright or Low Light
Use a Tripod
In low light? Slower shutter speeds like 1/10s can cause blur—unless you’re using a tripod. A solid tripod is your best friend in manual mode.
Expose to the Right (ETTR)
This technique slightly overexposes (without clipping highlights) to retain shadow detail. Check that histogram and lean it just to the right!
>>> Buy full range of DSLR cameras HERE <<<
Freezing Motion vs. Creating Blur
This is the fun part of manual. Want to freeze a flying bird? Go 1/1000s. Want silky waterfalls? Slow it down to 1/15s. It’s your creative choice.
Manual White Balance Tips
Switch from Auto WB to Kelvin mode or use a gray card. This keeps your colors consistent, especially under mixed or weird lighting (like fluorescent).
Why RAW Rocks in Manual Mode
Shooting RAW gives you room to fix exposure or white balance later. When using manual mode, RAW is a safety net—it’s way easier to adjust in editing.
Common Mistakes and Fixes
-
Blown highlights? Use a faster shutter or narrower aperture.
-
Noisy photo? Lower ISO or add light.
-
Out of focus? Use Live View or a smaller aperture.
Manual mode takes practice—but mistakes are part of the process!
DIY Exercises to Sharpen Skills
Shoot One Scene with Different Settings
Try this: Keep your subject still, and take multiple shots by only changing one setting at a time. You’ll quickly learn how each part of the triangle works.
Wrapping Up
Manual mode may feel intimidating, but it’s also empowering. Once you understand how to shoot in manual mode on DSLR, your photos will go from good to unforgettable. You’ll have full control, creative expression, and consistent results.
Now go out there and own your camera—you’ve got this!
>>> Buy full range of DSLR cameras HERE <<<
Frequently Asked Questions
Q1: Do I need a fancy DSLR to shoot in manual?
Nope! Any DSLR or mirrorless with an “M” mode is good enough. It’s about knowledge, not gear.
Q2: What if I mess up the exposure?
That’s normal. Review your histogram, adjust, and try again. Even pros chimp (check the back screen) now and then.
Q3: Can I use flash with manual mode?
Absolutely. You’ll still control ambient exposure with shutter, aperture, ISO—and let the flash handle the rest.
Q4: Should I always shoot in manual?
Not always—sports or wildlife might need shutter/aperture priority. But manual shines in portraits, landscapes, and controlled scenes.
Q5: How long does it take to get comfortable?
Usually a few dedicated practice sessions. Just shoot daily and review what works—and what doesn’t.
Read other relevant articles:


