Beginner’s Guide to Photo Editing with Lightroom
If you’re new to photo editing, I get it—it can feel overwhelming. But trust me, as someone who’s been there, Lightroom is where so many portrait photographers start their journey. In this step‑by‑step, conversational guide, I’m walking you through my beginner Lightroom editing workflow for portraits, sharing why each step matters and how to nail it.
Why Lightroom Is Ideal for Beginners
Adobe Lightroom is awesome because it merges photo organization and editing in one place. It’s non‑destructive, meaning your original image stays untouched—you can always undo things. You’ll work mostly in the Library and Develop modules, keeping everything organized and editable. It’s a friendly, forgiving tool that grows with you—perfect for getting started.
Preparing Your Workflow
A tidy workflow makes editing faster and more consistent. I set up folders by shoot date, client or theme. Import presets can automatically apply basic metadata, keywords, and even develop settings on import.
Importing and Organizing Photos
I begin in the Library module:
-
Click Import, select source (SD card or folder).
-
Choose destination and apply metadata or keywords.
-
Assign a color label or star rating if I know what’s working already.
A clean import gives you a solid foundation
Culling and Selecting Portraits
In Loupe View, I scan quickly through my photos. I flag or star my favorites—usually portraits I want to edit. This helps me focus on the best images, avoiding wasted time editing everything.
Understanding RAW Files and Color Profiles
RAW files retain maximum data—this gives you more flexibility in editing color, exposure, and details. On import, Lightroom applies a default color profile (like Adobe Color or Adobe Neutral) . Experimenting with different profiles can dramatically change the mood of your portrait—so it’s worth testing.
Basic Global Adjustments
Start broad, then get detailed—like layering flavor into a soup.
Exposure, Contrast, and White Balance
Adjust your exposure so mid‑tones look balanced, lift highlights, and roll back shadows. Set white balance: around 5,500K for neutral skin tones in sunlight, tweak slightly warmer or cooler based on mood
Tone Curve and Color Profiles
Use the tone curve to fine‑tune contrast—lift shadows a bit and deepen highlights. Changing profiles from Adobe Color to Portrait or Neutral can enhance skin rendering instantly
Local Adjustments for Portraits
Now start refining details on the face and features.
Spot Removal and Blemish Fixing
Use the Spot Removal tool (Heal mode) to remove blemishes or stray hairs. Adjust your brush size with bracket keys for accuracy—bigger than the spot. Moving slowly keeps edits natural
Dodge and Burn Techniques
With the Adjustment Brush, use Dodge (brighten) under eyes or clip light areas, and Burn (darken) along jawline or to sculpt facial structure. Use low opacity (10‑20%) and feathered edges for subtlety
Enhancing Eyes, Teeth & Skin Tone
Brush selectively on the iris to increase clarity or brightness. Use the teeth whitening preset brush on teeth (Range Mask: Color) for precision. Skin tone: adjust warmth and exposure slightly to even out the complexion without over‑retouching


Sharpening and Noise Reduction
Head to the Detail panel (Develop module):
-
Noise reduction: Move Luminance up gently (10‑20) if there’s grain.
-
Sharpening: Increase amount (~50‑70), radius (~1‑1.5), and detail (~25).
Use masking to apply sharpening only to edges (hold Alt/Option while dragging). This avoids noisy skin
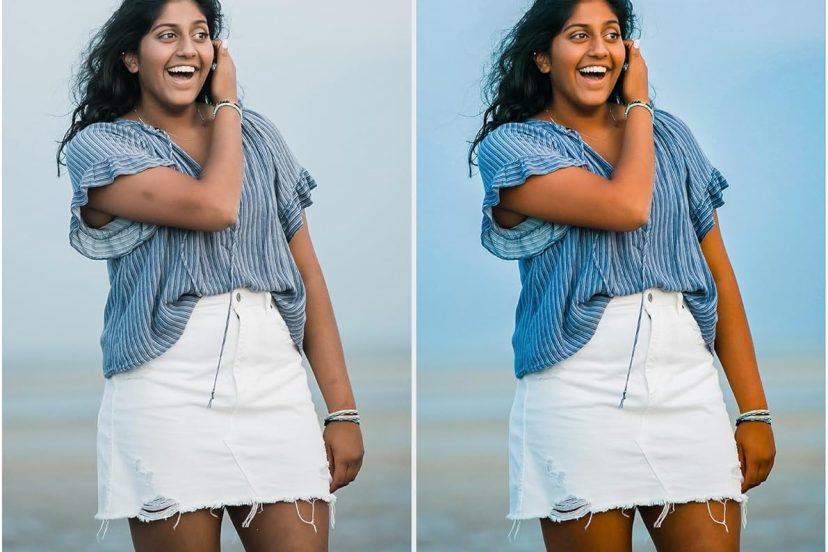
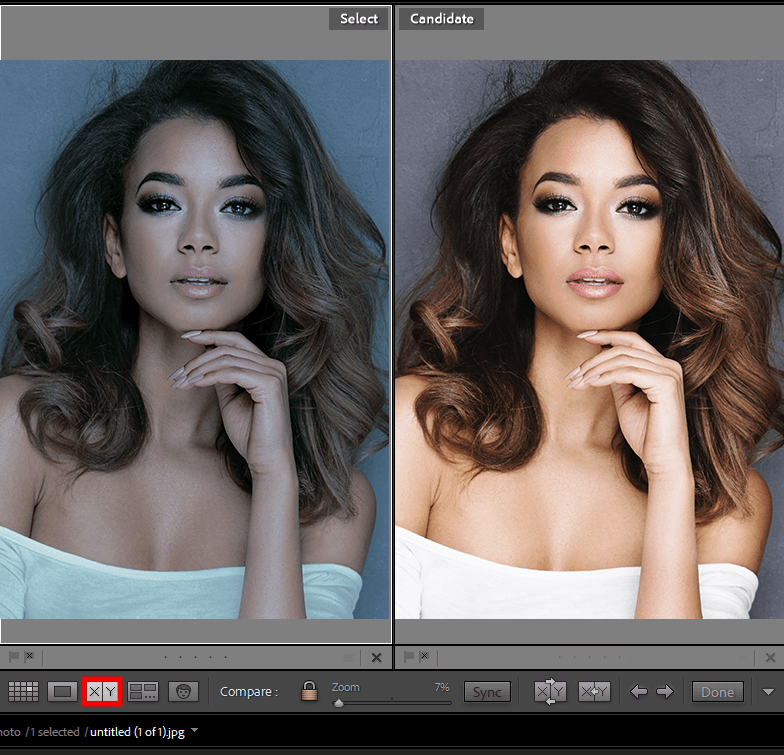
Viewing Before and After Comparisons
To gauge your progress, use Lightroom’s compare views:
-
Press ** (backslash) to toggle full-screen before/after.
-
Hit Y for side‑by‑side comparison or Shift+Y for split-screen.
-
These views help you see how your edits enhance the image
Fine‑Tuning and Presets
Once you find settings you like, save them as a Preset so you can apply the same adjustments to other portraits quickly. That keeps your edits consistent across your portfolio
Exporting for Web and Print
After edits:
-
Choose Export, set folder and filename template.
-
For web: export JPEG at 1080px width, quality ~80, convert to sRGB color space.
-
For print: TIFF or JPEG at 300 dpi, larger size, convert to Adobe RGB.
Don’t forget to watermark or embed metadata if needed.
My Personal Workflow Tips
Here’s what works best for me:
-
I always shoot in RAW and slightly overexpose by +⅓ EV—this helps retain detail in shadows and gives more dynamic range.
-
I try to edit on a calibrated monitor so my white balance is reliable.
-
I use virtual copies in Lightroom to experiment without losing earlier versions.
-
I limit heavy edits to final selects—culling keeps me efficient.
Practice Projects and Consistency
Want to master your workflow? Try:
-
Batch editing 5‑10 portraits from one session using the same preset.
-
Compare before/after versions in different lighting situations (studio, window light, outdoors).
-
Practice using keyboard shortcuts: , Y, Shift+Y, D (Develop), E (Loupe).
Consistency helps build speed and style.
Workflow Checklist (Summary)
-
Import → Add metadata and keywords
-
Cull using flags or stars
-
Apply color profile / adjust white balance
-
Global sliders: exposure, contrast, tone curve
-
Local adjustments: spot removal, dodge & burn, eye whitening
-
Noise reduction / sharpening
-
Compare before/after (use backslash, Y)
-
Save presets for recurring edits
-
Export properly (web, print, color space)
Conclusion
Editing portraits in Lightroom can feel complex at first, but following a consistent beginner workflow—from import to export—makes it smoother and more creative. With practice, you’ll find your rhythm and start editing with confidence and speed. Stick with this beginner Lightroom editing workflow for portraits, shoot in RAW, and experiment with subtle tweaks. You’ll be amazed at how your portraits evolve.
>>> See TODAY’s deals on lightroom products HERE <<<
FAQs
1. How long should a beginner spend editing one portrait in Lightroom?
Usually 5‑10 minutes for a clean edit—a few more minutes if you’re doing dodge/burn or spot removal.
2. Do I need Photoshop after editing in Lightroom?
Mostly no—Lightroom handles most tasks. But you might use Photoshop for advanced retouching beyond Lightroom’s scope.
3. Are presets worth using as a beginner?
Yes—presets can help you maintain consistency and speed up edits. Just tweak afterward to maintain a natural look.
4. What resolution is best for Instagram export?
Export JPEGs at about 1080px wide, quality ~80, in sRGB color space for best results.
5. Should I sharpen before or after noise reduction?
Apply noise reduction first, then sharpen—this gives a cleaner final image with crisp detail.
Read more relevant posts HERE
Golden Hour Photography: Mastering Nature’s Most Magical Light


