Wildlife Photography Tips for Capturing Fast Action
Why Capturing Motion in Wildlife Photography Rocks
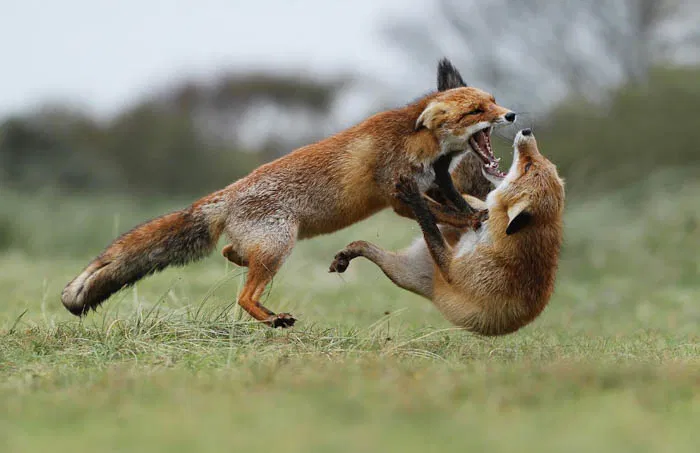
The Thrill of the Freeze-Frame
Ever caught that heart-slamming moment when a bird banks sharply or a fox springs? Capturing wildlife in motion feels like hitting pause on nature’s action film—and it’s incredibly satisfying.
Storytelling Through Movement
Action adds drama. You’re not just taking photos—you’re telling stories. A glimpse of wings, a splash, a darting tail: these make your images come alive.
Gear Checklist: What DSLR Equipment You Need
Camera Body: Speed Matters
Your DSLR needs to shoot fast. Look for high frames-per-second (fps) and quick buffer clearing. If your camera fires 8–12 fps, you’re already ahead of the game.
Lens: Reach and Aperture
A telephoto zoom or fast prime (like 200–400 mm, preferably f/2.8–f/4) helps you both reach distant action and get enough light to freeze the moment.
Tripod, Monopod & Support Gear
Heavy telephoto lenses benefit from a monopod or tripod. Lightweight carbon fiber supports reduce fatigue and keep shots sharp—especially when panning.
Memory Cards & Battery Essentials
Shoot RAW and continuous bursts? You’ll need fast, high-capacity cards. Same with backup batteries—you don’t want your gear to bail mid-chase.
Master Your Settings: Freezing Fast-Paced Wildlife
Shutter Speed: The First Thing to Boost
Shutter speed is king when freezing action. Aim for at least 1/500s—but fast-moving birds often need 1/1000s or faster.
Aperture: Balancing Light and Depth
Keep your aperture wide to let in light and keep the subject sharp against a soft background. However, don’t go too shallow—some depth of field helps when subjects move unpredictably.
ISO: Exposure Triangle’s Third Corner
Higher shutter and wider aperture both demand more light. Bump up ISO as needed—modern DSLRs can handle it well. Just watch for noise creeping in.
Noise vs. Speed Trade-offs
Sometimes grain is better than motion blur. You can neutralize noise in post later, but a missed moment stays missed.
Autofocus Techniques That Nail the Shot
Continuous Servo (AI-Servo / AF-C)
Switch to continuous tracking mode—this keeps your focus on moving subjects instead of locking on and losing them.
Back-Button Focus for Control
Shift autofocus to a back button so you can separate focusing from shooting. It’s intuitive and helps with tracking erratic movement.
Focus Points: Spread vs. Center
Using a spread of focus points helps keep moving subjects in focus across your frame. Stick with center-only only if you like guessing games.
Composition & Tracking: Keeping Subjects in Frame
Anticipating Animal Behavior
Animals repeat patterns. Spend time observing them. Once you know their rhythm, you can pre-focus and be ready for that sprint or leap.
Panning: Motion with a Blur or Freeze?
Want to show speed? Track your lens to the subject while using 1/30–1/60s. Want to freeze every feather? Stick to 1/1000s or higher.
Framing for Dynamic Impact
Leave space in the frame for the subject to move into—this gives a sense of motion and avoids cramped compositions.
Lighting & Location: Planning for Action
Shoot in Good Light, Early or Late
Soft morning or twilight light gives both drama and better shutter performance. Shadows are gentler, details stand out, and ISO stays low.
Hide, Camouflage, and Positioning
Blend in. Use blinds, natural cover, or camouflage to get closer. The less you startle wildlife, the more natural—and action-ready—the shot.
>>>See TODAY’s deals on telephoto lenses HERE <<<
Post-Processing Tips for Action Shots
Cropping and Straightening
Centering your subject isn’t mandatory but ensuring the horizon is level keeps things grounded. Cropping tight can emphasize the motion.
Noise Reduction and Sharpening
Apply selective noise reduction (shadow areas often suffer more) and sharpen slightly—but keep it natural.
Color, Contrast, and Clarity Boosts
Push contrast and clarity carefully—these often enhance motion by adding depth and separation without overdoing it.
Common Mistakes to Dodge
Too Slow Shutter Speed
Nothing kills action like motion blur—in most cases, you’re better off increasing ISO and freezing the moment.
Over-reliance on Auto Mode
Auto modes may adjust mid-burst and ruin consistency. Learn to control exposure settings manually for consistency.
Ignoring Animal Behavior
No amount of gear will help if you’re not watching your subject. Study movement—it’s your biggest ally.
Conclusion
Capturing wildlife in motion is like chasing wild poetry—you freeze a moment of untamed beauty and share it. By gearing up smartly, mastering settings, anticipating animal behavior, and post-processing with care, you’ll go from chasing blurry flukes to crafting stunning, story-rich action shots. Trust me—once you nail that wing-beat or leap in crisp detail, you’ll be hooked.
>>>See TODAY’s deals on telephoto lenses HERE <<<
5 FAQs About Photographing Wildlife in Motion with DSLR
-
What’s the bare minimum shutter speed for sharp wildlife action?
I usually go no slower than 1/500s—1/1000s or faster is even better, especially for birds or fast mammals. -
Can I handhold fast telephoto lenses?
You can, but a monopod or gimbal head makes a huge difference in reducing fatigue and keeping your shots steady. -
Should I always shoot in RAW for action?
Absolutely—RAW gives you more flexibility for exposure tweaks and noise reduction later, crucial for fast shots. -
Is back-button focus really worth the switch?
Totally. It gives better control when tracking erratic subjects. Once you get used to it, you’ll wonder how you shot any other way. -
How do I avoid alarmed wildlife?
Be patient, stay low, use natural cover, and move slowly. Calm presence usually equals action you can capture—not scare away.


