Rule of Thirds Explained with Photo Examples

Hey there, I’m your rule of thirds photography examples for beginners buddy! Today, I’m breaking down the rule of thirds using real-world photo examples, easy tips, and beginner-friendly drills.
Let’s take your composition from “meh” to “wow!”
🔍 What Is the Rule of Thirds?
The rule of thirds divides your frame into nine equal parts using two horizontal and two vertical lines.
It helps you place key elements—like your subject, horizon, or focal points—off-center to create balance and interest.
🎯 Why It Matters in Photography
Why bother with all these lines?
Because it makes your photos look more professional and pleasing. Instead of centering everything, you’re guiding the viewer’s eyes naturally.
Think of it as using visual gravity.
📱 How to Activate the Grid on Your Camera
Want to see the rule of thirds in action? Turn on the 3×3 grid:
-
DSLR/Mirrorless: Go to your camera menu → Display Settings → Enable Grid
-
Smartphones: In your camera app → Settings → Enable Grid
Now you’ve got your framing assistant on-screen!
🎯 Placing the Subject at Intersections
Use the four intersecting points of the grid to place your subject.
It creates tension, balance, and visual storytelling—unlike center placement, which often feels stiff or static.
🌅 Horizon Line Technique
One of the easiest ways to apply the rule of thirds?
✔️ Put the horizon on one of the horizontal lines.
-
Sky-heavy drama: Horizon goes on the bottom third
-
Textured foreground: Horizon on the top third
This instantly boosts visual impact.
🧍 Rule of Thirds in Portrait Photography
When photographing people, align the subject’s eyes along the top third line. That’s where the human eye naturally looks!
Also, if your subject is looking to one side, leave space in that direction. It creates a sense of openness.
>>> See TODAY’s deals for DSLR kit and accessories HERE <<<
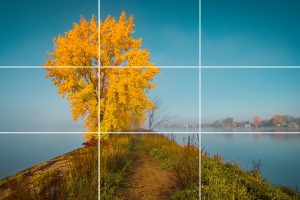
🌄 Rule of Thirds in Landscape Photography
Landscapes often feature sky, land, and foreground. Use your thirds grid to:
-
Highlight dramatic skies (⅓ sky, ⅔ land)
-
Emphasize terrain or depth (⅔ foreground, ⅓ sky)
-
Place focal objects like trees or hills on vertical lines
🦋 Rule of Thirds in Wildlife & Macro
Photographing a bird, bug, or butterfly?
-
Place the head or eye on a cross-point
-
Allow breathing room for direction or movement
-
Don’t center the whole animal—keep it dynamic
This technique creates depth, even in close-ups.
🛠 Editing with Rule of Thirds
Didn’t get it right in camera? No sweat.
Most editing tools (like Lightroom or Snapseed) let you crop with a rule-of-thirds overlay.
🎯 Quick Tip: In Lightroom, press R to enter crop mode with the grid.
🔗 Common Composition Partners
The rule of thirds shines when paired with:
-
Leading lines – paths, fences, rivers
-
Negative space – gives your subject breathing room
-
Framing – use windows, arches, or trees for natural framing
It’s not just one rule—it’s teamwork!
🚫 When to Break the Rule
Yes, break it sometimes. Great photography isn’t just about rules.
-
Center for symmetry (think reflections or architecture)
-
Go minimal with a centered subject and lots of empty space
-
Use center composition for drama or contrast
You’re the artist—know the rule, then break it on purpose.
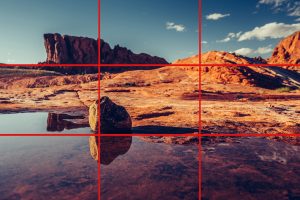
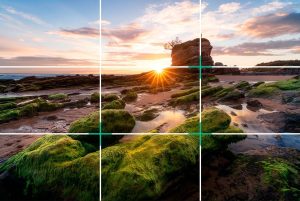
🖼 Examples with Photos
Let’s see some real-life uses:
-
🏞 Landscape with the horizon on the lower third, mountain placed left of center
-
👤 Portrait where eyes land on the top third and subject looks into the open space
-
🐦 Wildlife shot with the bird’s eye on an intersection and wings sweeping diagonally
These compositions feel natural and balanced, right?
📸 Practice Exercises
Ready to try this yourself?
-
Exercise 1: Photograph a person off-center using the grid
-
Exercise 2: Take 3 landscape photos—each with a different horizon placement
-
Exercise 3: Center your subject, then take the same shot using rule of thirds. Compare the vibe.
The more you do it, the more intuitive it becomes.
🧩 Troubleshooting Common Issues
If something feels off, try this:
-
✅ Crooked? Align your subject with horizontal/vertical thirds
-
✅ Too centered? Shift slightly to a third and see the difference
-
✅ No breathing room? Use the rule of space for direction
📚 Tools and Resources
Want more help? Try these:
-
Snapseed / Lightroom Mobile: Free editing with cropping grid
-
PhotoPills app: Planning shots with the rule of thirds in mind
-
Canva / Fotor: Online editors that include grid tools
🧠 Conclusion & Key Takeaways
The rule of thirds is your launchpad to better composition. It gives your photos structure, balance, and visual interest—without being overly complicated.
So keep that grid on, experiment a little, and build your photography instincts.
🎯 Remember: Learn the rule, then master when to break it.
>>> See TODAY’s deals for DSLR kit and accessories HERE <<<
❓ FAQs
1. Is the rule of thirds always necessary?
Nope! It’s a guideline, not a law. Use it to strengthen shots, but break it when your composition demands.
2. Can I use this rule on mobile photography?
Absolutely! Most phone cameras support the 3×3 grid—just activate it in the settings.
3. How do I fix a photo that’s not composed correctly?
Use cropping tools in your editor to realign your subject to fit the rule of thirds.
4. Does the rule of thirds work for vertical photos too?
Yes, it works just the same! Vertical orientation still divides into 3×3.
5. What’s next after I master the rule of thirds?
Explore other techniques like symmetry, golden ratio, or layering. Your creative world just opened up!


