Mastering the Exposure Triangle: ISO, Aperture, and Shutter Speed Explained
If you want to understand ISO, aperture & shutter speed and take full control of your camera settings, you’ve come to the right place. In this guide, I’ll break down how these three essential elements work together to create stunning photos — and how you can master them step by step.
What Is the Exposure Triangle?
The exposure triangle is photography’s foundation. It’s made up of ISO, aperture, and shutter speed — the three settings that determine how bright or dark your photo will be.
Why It’s Called a “Triangle”
Each corner of the triangle affects exposure, and changing one means adjusting the others to maintain balance. Think of it like juggling light — ISO, aperture, and shutter speed must work in harmony.
How Each Element Works Together
-
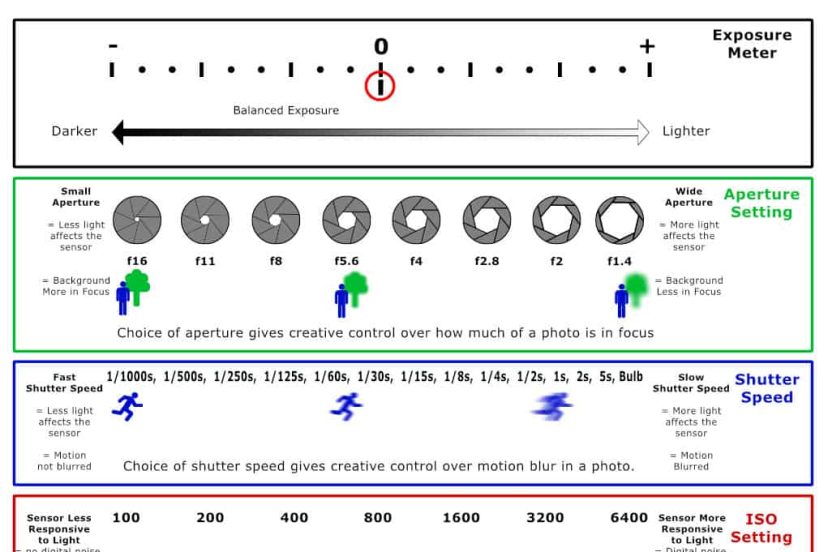
ISO controls your camera sensor’s sensitivity to light.
-
Aperture manages how much light enters through the lens.
-
Shutter speed decides how long that light hits the sensor.
Together, they decide whether your photo looks crisp, moody, or blown out.
Understanding ISO
What Is ISO?
ISO measures your camera’s sensitivity to light. A low ISO (like 100) means less sensitivity — ideal for bright days. A high ISO (like 3200 or more) increases sensitivity for darker environments.
How ISO Affects Exposure
Raising ISO brightens your image, but it also adds digital noise — that grainy texture you see in dark photos. The trick is finding the sweet spot for each lighting condition.
Best ISO Settings for Different Lighting
-
Sunny outdoor scenes: ISO 100–200
-
Indoors with natural light: ISO 400–800
-
Night photography or concerts: ISO 1600–3200+
💡 Pro tip: Always start with the lowest ISO possible for clean, detailed images.
Mastering Aperture
What Is Aperture and How It Works
Aperture is the opening inside your lens that lets light in. It’s measured in f-stops (like f/1.8, f/4, f/16). A small f-number (f/1.8) means a wide opening; a large f-number (f/16) means a narrow one.
Aperture and Depth of Field
A wide aperture (f/1.8–f/2.8) creates a blurry background — perfect for portraits. A narrow aperture (f/8–f/16) keeps everything sharp, ideal for landscapes.
Creative Uses of Aperture in Photography
Play with aperture to tell visual stories — dreamy bokeh for romantic shots, or deep focus for dramatic scenery.
Controlling Shutter Speed
What Is Shutter Speed?
Shutter speed is how long your camera’s shutter stays open. Fast speeds (1/1000 sec) freeze action; slow speeds (1/30 sec or slower) capture motion blur or light trails.
Fast vs Slow Shutter Speeds Explained
-
Fast shutter (1/500–1/4000): Ideal for sports or wildlife.
-
Slow shutter (1/10–1 sec): Great for waterfalls, night skies, or light painting.
Shutter Speed Tips for Sharp Images
Always use a tripod when working with slow shutter speeds to avoid camera shake. For handheld shots, use the “1/focal length” rule — e.g., 1/50 sec for a 50mm lens.
How the Exposure Triangle Balances Light
The Relationship Between ISO, Aperture, and Shutter Speed
Imagine your camera is a bucket catching rain (light).
-
Aperture is how wide the bucket’s opening is.
-
Shutter speed is how long you hold it out.
-
ISO is how thirsty the bucket is for water.
Balance these, and your exposure will be perfect.
Using Manual Mode to Take Control
Manual mode gives you the freedom to adjust all three settings. Start with aperture priority (A/Av) or shutter priority (S/Tv) modes to learn how each affects your photos.
>>> TODAY’s camera deals CLICK HERE <<<
Common Mistakes Beginners Make
Overexposed vs Underexposed Shots
Overexposed shots lose detail in bright areas; underexposed shots are too dark. Check your histogram to keep exposure balanced.
Forgetting to Check ISO Settings
Many beginners leave ISO high from a night shoot — resulting in noisy daylight shots. Always reset ISO before starting a new session.
Practical Exercises to Master Exposure
Step-by-Step Exposure Practice Routine
-
Set your camera to manual mode.
-
Start with ISO 100, f/5.6, shutter 1/125 sec.
-
Adjust one setting at a time and observe changes.
-
Shoot the same subject in different lighting.
Using Histogram and Light Meter
Your histogram shows if your photo is too bright or dark. The light meter inside your viewfinder helps you fine-tune exposure in real time.
My Favorite Camera Settings for Different Scenarios
Portraits
-
Mode: Aperture Priority
-
ISO: 100–400
-
Aperture: f/1.8–f/2.8
-
Shutter: Auto
Landscapes
-
Mode: Manual
-
ISO: 100
-
Aperture: f/8–f/16
-
Shutter: 1/60–1/125
Night Photography
-
Mode: Manual
-
ISO: 1600–3200
-
Aperture: f/2.8
-
Shutter: 1/10–5 sec (tripod recommended)
Bonus Tips: Moving Beyond Auto Mode
Learning to Trust Manual Mode
Manual mode may seem intimidating at first, but it’s the best way to understand light. The more you experiment, the faster it becomes second nature.
When to Use Semi-Automatic Modes
When time matters — like during events or travel — use aperture or shutter priority modes. They give control while adjusting exposure automatically.
Conclusion
Once you understand ISO, aperture & shutter speed and take full control of your camera settings, you’ll unlock endless creative possibilities. The exposure triangle is your key to shaping light, mood, and storytelling — one shot at a time.
>>> TODAY’s camera deals CLICK HERE <<<
FAQs
1. What is the easiest part of the exposure triangle to learn first?
Start with aperture — it gives visible creative results like background blur.
2. Can I shoot in manual mode as a beginner?
Absolutely! Begin with small steps and practice balancing light.
3. Why are my low-light photos always grainy?
You’re likely using a high ISO. Try a tripod and slower shutter instead.
4. Is there a perfect exposure setting?
No — it depends on lighting, subject, and creative intent.
5. What’s the best way to remember the exposure triangle?
Think ISO = sensitivity, Aperture = opening, Shutter = time. Balance all three for perfect exposure.
Further photo tips here:


