Macro Photography: A Beginner’s Guide to Capturing Tiny Wonders
Have you ever looked at a dewdrop on a leaf and wondered what it’d look like up close—really close? That’s the heart of macro photography. It’s about diving into the details, exploring textures, patterns, and forms too small to appreciate with the naked eye.
I’ve been obsessed with macro for years, and let me tell you—it never gets old. Whether you’re fascinated by insect wings, water droplets, or the fine grain of sand, macro photography brings an entirely new world into view.
Let’s dive deep into the art (and science) of macro photography.
What is Macro Photography?
Defining Macro in Photography Terms
Macro photography refers to capturing subjects at a 1:1 magnification ratio or greater. In simple terms, that means your subject appears life-size—or even larger—on your camera sensor.
True Macro vs Close-Up
It’s easy to confuse macro photography with close-up photography, but here’s the difference: macro = magnification, close-up = proximity. A true macro shot reveals intricate detail, not just a zoomed-in image.
Why Macro Photography is So Fascinating
Discovering a Hidden World
When you start shooting macro, even your backyard turns into a jungle of discovery. Spider webs, moss, raindrops—there’s beauty in the tiniest corners of nature.
Challenging Yet Rewarding
Macro photography requires patience, precision, and a steady hand. But once you nail that perfect focus on a bee’s eye or the symmetry of a flower petal? It’s pure magic.
Essential Gear for Macro Photography
Macro Lenses
The holy grail. These are designed specifically for close focusing distances and true 1:1 magnification. Popular choices:
-
Canon 100mm f/2.8L Macro
-
Nikon 105mm f/2.8
-
Sony 90mm Macro G
Extension Tubes and Reverse Rings
On a budget? These let you get closer with your existing lenses. Extension tubes go between your lens and camera. Reverse rings let you mount your lens backward for macro capability.
Tripods and Focus Rails
For extra stability, especially when working with shallow depth of field. Focus rails let you move the camera slightly without touching your setup—perfect for stacking images later.
Camera Settings for Stunning Macro Shots
Aperture and Depth of Field
Shooting macro means dealing with razor-thin depth of field. A smaller aperture (like f/8–f/16) helps increase focus area, though it reduces light.
ISO and Shutter Speed
Keep ISO low (100–400) to avoid noise. Shutter speed depends on your lighting—go faster for moving subjects like bugs, or slower (with a tripod) for still-life shots.
Manual Focus vs Autofocus
Manual focus is your best friend. Autofocus often struggles in macro conditions. Use focus peaking or live view magnification for precision.
Lighting in Macro Photography
Natural Light vs Artificial Light
Natural light can work beautifully—but it’s not always consistent. Mornings and late afternoons offer soft, even light.
Ring Lights and Diffusers
Ring lights give even illumination without harsh shadows. Diffusers soften direct sunlight or flash, reducing blown-out highlights and harsh contrasts.
Composition Tips for Macro Photography
Framing the Subject
Just because it’s tiny doesn’t mean you can ignore the rules of composition. Try rule of thirds, leading lines, or even negative space to add drama.
Using Backgrounds to Your Advantage
A cluttered background can distract from your subject. Use a wide aperture or position your subject against a solid background like leaves, fabric, or even paper.
Popular Subjects for Macro Photography
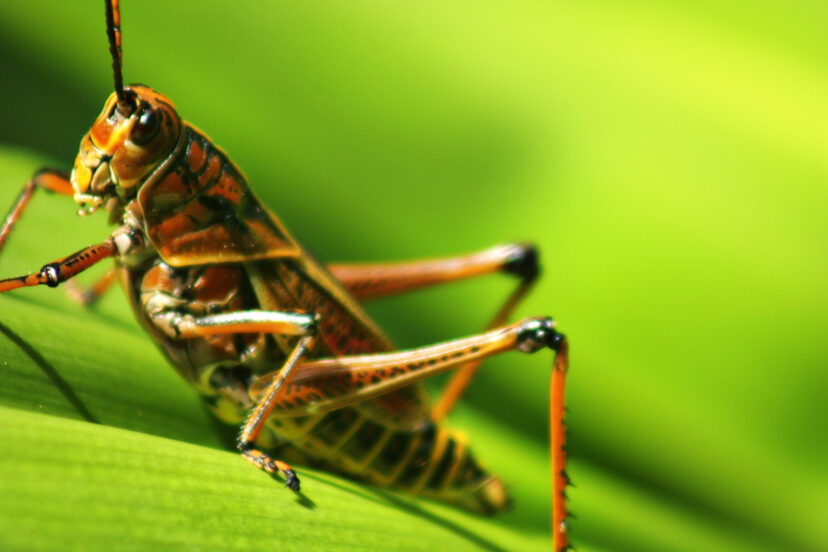
Insects and Bugs
Butterflies, beetles, and bees make fascinating (though sometimes squirmy) subjects. Mornings are best—they’re slower and easier to photograph.
Flowers and Plants
Nature’s perfect still-life. Explore patterns, colors, and textures. Bonus tip: try shooting flowers backlit during golden hour for dreamy results.
Textures and Everyday Objects
Feathers, fruit slices, fabric, matchsticks—you name it. Macro gives the mundane a magical makeover.
>> see full range of macro lenses here <<
Common Challenges and How to Overcome Them
Motion Blur and Camera Shake
Use a tripod and a remote shutter release. If you’re handholding, bump your shutter speed and brace yourself against a stable surface.
Getting Precise Focus
Focus stacking is a lifesaver. Take multiple shots at slightly different focus points and merge them using software like Helicon Focus or Photoshop.
Editing Macro Photos Like a Pro
Sharpening and Contrast
Don’t go overboard. Slight sharpening and clarity can enhance fine details, but too much makes things look unnatural.
Removing Distractions
Clone out dust, bugs, or background elements that draw the eye away from your subject. Keep the focus clean and clear.
Best Times and Conditions for Macro Photography
Golden Hours and Overcast Days
Soft light is your best friend. Overcast days offer diffused, shadow-free light. Golden hour adds warmth and glow.
Wind and Weather Considerations
Wind = movement = blur. Use windbreaks (even your body!) or shoot early when the air is still.
Conclusion
Macro photography is like stepping through a doorway into a miniature universe. It’s not just photography—it’s exploration, art, and patience rolled into one. Whether you’re in your backyard or on a nature trail, opportunities for stunning macro shots are everywhere—you just have to look closely.
So grab your gear, slow down, and start discovering the details you never noticed before. You’ll be amazed at what you find.
>> see full range of macro lenses here <<
FAQs
1. Can I do macro photography with my smartphone?
Yes! With clip-on macro lenses and camera apps that allow manual focus, you can get surprisingly detailed macro shots from your phone.
2. What is focus stacking, and do I need it?
Focus stacking involves combining multiple shots at different focus points to increase depth of field. It’s super useful, especially for still-life macro.
3. Do I need a dedicated macro lens?
Not necessarily. Extension tubes or reverse rings can give you macro abilities on a budget—but a true macro lens is ideal for quality and ease.
4. How close should I get to my subject?
It depends on your lens, but usually within a few inches. Just be mindful not to cast shadows or scare off tiny critters.
5. What editing software is best for macro photos?
Adobe Lightroom and Photoshop are top-tier. For focus stacking, try Helicon Focus or Zerene Stacker.
Further reading
Check out our other relevant articles:
Mirrorless vs DSLR: Right Choice for Your Photography Needs?
Here are two educational resources that provide valuable insights into macro photography:
-
Top 15 Macro Photography Tips – Adorama
This comprehensive guide offers practical advice for macro photography enthusiasts, covering topics such as composition, lighting, and gear selection. It emphasizes the importance of experimenting with angles and backgrounds to create compelling close-up images. -
How to Create Breathtaking Macro Photos: The Complete Guide – Digital Photography School
This in-depth article explores both the technical and creative aspects of macro photography. It discusses essential gear, lighting techniques, and composition strategies to help photographers capture stunning macro images.
These resources offer a wealth of information to enhance your macro photography skills, whether you’re a beginner or looking to refine your techniques.

Comments are closed.