Creative Posing Tips for Portrait Photography Beginners
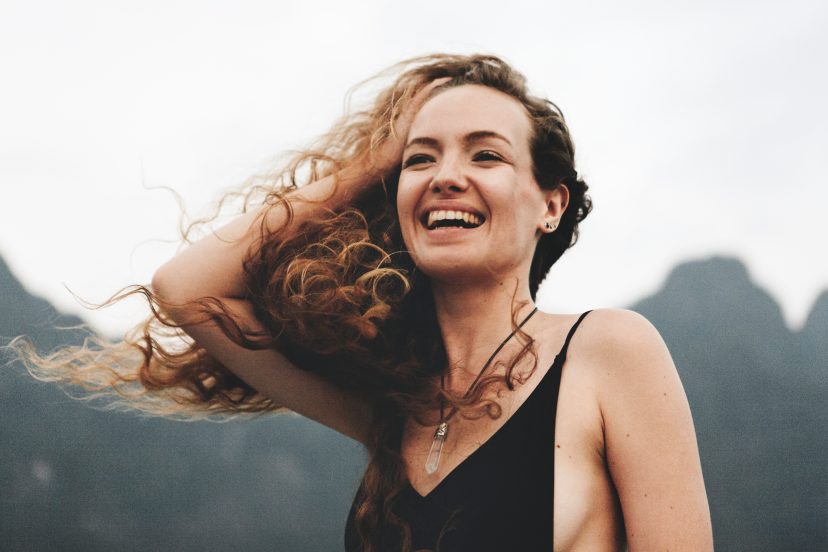
Today I’ll share simple posing tips to help beginners capture natural, confident portraits. These are the tricks I use all the time, broken into bite-size steps. If you’re reading this, you probably want to capture people beautifully, not just “take photos of faces.” I’ve been in your shoes.
Why Posing Matters: Beyond Just Standing Still
If you ask your subject to “pose,” you might see them freeze like a statue. But good posing is about guidance, flow, and comfort. A great pose makes someone feel relaxed, which shows up in their eyes, posture, and micro-movements.
Posing is not rigid; it’s an art of subtle direction. It helps the camera read a person’s body language in the most flattering way.
>>> TODAY’s DSLR camera deals CLICK HERE <<<
My Philosophy: Natural, Confident Portraits
I believe in minimal direction, maximum comfort. I don’t want my subjects to feel like mannequins. Instead, I aim for small nudges, micro-adjustments, and positive reinforcement. When people feel seen, they relax—and that’s when magic happens.
Start with a Warm-Up: Break the Ice
Movement & Micro-Adjustments
I begin by asking my subject to shift weight, wiggle shoulders, turn slightly. Those tiny movements loosen stiffness. Sometimes I tell them: “Take a breath in… exhale slowly… tilt your shoulder just a touch.” These micro changes look subtle but matter.
Chat & Laugh to Relax
I often start with conversation. “Tell me a funny moment…” or “What’s your favorite song right now?” Laughing or conversing while posing helps drop tension. I keep the camera down, engage, then raise it when the subject looks more natural.
Body Position Basics
The 45° Turn / Angle Your Body
Instead of facing the camera straight on, have them turn their shoulders about 30–45°. This adds depth and avoids a flat, “pressed against the lens” look. It slims the frame and helps lines flow.
Weight on One Leg (for Flow)
Ask them to shift weight onto their back leg. The front leg can bend or be angled. This gives a natural “S” shape and prevents the pose from looking rigid.
Avoid Flat Fronts — Use Depth
Encourage twisting a little—body to one side, head turned to camera. That slight twist adds visual interest and depth. If everything is straight to camera, it becomes flat and static.
Posing Hands & Arms with Grace
Keep Them Slightly Bent, Not Straight
Straight arms pressed to the body look stiff. Instead, allow a gentle bend at the elbow. Even resting an arm on a hip, thigh, or surface helps.
Hands Near Face: Use Soft Touches
If the hands come near the face, ask your subject to touch jaw, cheek, or hair lightly. Don’t press—just gently rest fingertips. This feels more natural and reduces tension.
Props or Environment Help Hands
Let them hold something (a scarf, flower, jacket) or lean against something (a wall, railing). That gives the hands purpose and solves the “what do I do with my hands?” dilemma.
Head, Chin & Eyes: The Essentials of Expression
Chin Forward + Down (“Chicken Neck”)
One of the best posture moves: ask them to push their chin forward ~1 inch, then drop it slightly. That helps define the jawline and avoids hidden double chin issues.
Eye Focus & Soft Expression
Eyes see everything. Guide them: “Look just past me,” or “Imagine something you love.” Soft eyes (not squinting) help make a portrait feel real. If they’re tense, they’ll over-squint.
Tilting Head vs Straight On
A slight head tilt can add personality. But don’t overdo it. If they tilt toward the closer shoulder (toward the lens) it’s often flattering; avoid tilting away too much so ears don’t disappear.
Poses for Seated & Leaning Portraits
The Leaning Forward Trick
When seated, I ask subjects to lean slightly toward me. It forces engagement and brings energy forward. It also naturally creates tension in the posture in a good way.
One Leg Over Another / Crossed Ankles
I like having one leg bent and crossed or ankles crossed when seated. That creates a graceful line rather than both legs parallel and stiff.
Leaning Back or Against a Surface
Let them lean back gently or rest part of their body against a wall. But I avoid full collapsing. A tiny lean gives comfort; too much looks lazy or distorted.
>>> TODAY’s DSLR camera deals CLICK HERE <<<
Posing for Full Body & Group Portraits
S-Curve & Body “S” Shapes
For full-body, I guide an “S-curve” posture: one hip back, one knee forward, shoulders angled. That curvature is pleasing to the eye and avoids straight lines.
Interaction Between People / Touches
If photographing two or more, I encourage gentle connection: hands on shoulders, leaning into each other, small touches. That bond shows. Just avoid forced hugging—the subtle touches are stronger.
Communicating with Your Subject
Use Simple Phrases (e.g. “Look just past me”)
Short, clear directions work best. Over-explaining confuses. I use phrases like: “Tilt slightly,” “Chin just a touch,” “Relax that arm.” Keep it simple.
Ask Them to Move Slowly & Gently
Movement helps find the “pose moment.” I often say: “Keep moving very slowly, and I’ll stop you when it feels right.” That helps freeze the natural pause.
The Power of Direction + Praise
I pair a direction (“okay, turn just a little”) with praise (“that’s perfect, hold that”). It builds confidence and helps them trust your eye.
Fixing Common Posing Mistakes
Stiffness / Locked Joints
If arms or legs are straight and rigid, ask the subject to bend knees or elbows. “Give me a micro bend.” That little release softens the pose.
Double Chin or Hidden Jawline
Use the “chin forward + down” trick. Sometimes, ask them to look up into the light slightly. Small tilts of head, repositioning, or backing the camera a bit help.
Limbs Merged Into Body (no gap)
Always create separation. For example, have an arm slightly away from torso, one leg forward. If limbs merge, it flattens contours. Encourage little gaps so each limb reads.
Posing Challenges & How to Overcome Them
Nervous Subjects / First Time Models
I warm them up with no-pressure shots, let them hold props, talk while shooting, and start with easy, safe poses. Often by frame 10 they’re more relaxed.
Children & Fidgeters
With kids I keep sessions short, playful, interactive. Ask them to walk toward you, jump, or spin. Capture moments in between directions rather than forcing stillness.
Diverse Body Types — Flattering Everyone
I tailor direction. For larger bodies I guide weight distribution (slight turn, arm away, elongate the neck). For tall or slim, I use lines and angles to emphasize strengths. Posing is not one size fits all—adapt.
Practice Drills & Exercises for Improvement
Mirror / Self-Pose Daily
Spend 5 minutes in front of a mirror, try different torso angles, head tilts, hand placements. You’ll internalize what works (for you or your subjects).
Create a Posing Cheat Sheet
Collect 5–10 poses you like (with angles, arm/hand maps). Print or keep on your phone. Use when you’re in a creative rut.
Mock Sessions with Friends
Practice with friends or willing subjects. Try poses, directions, respond to feedback. The more you see others in-frame, the sharper your eye becomes.
My Go-To Posing Flow / Checklist
Here’s the order I often use:
-
Break the ice: movement, chat
-
Start with body angle (45° twist)
-
Shift weight and adjust legs
-
Position hands & arms
-
Set head tilt, chin, and eyes
-
Ask micro tweaks + adjust
-
Watch expression & release tension
-
Capture multiple frames while direction is fresh
By going in this flow, I rarely have to rethink. It becomes intuitive.
Conclusion
Posing is a dialogue — one between you (the photographer) and your subject. These simple posing tips to help beginners capture natural, confident portraits are not rules to rigidly follow, but guidelines to interpret and adapt. Start slow, practice often, and always keep communication open. Over time what feels awkward becomes second nature—and the real you (or your subject) will shine through your portraits.
>>> TODAY’s DSLR camera deals CLICK HERE <<<
FAQs
1. How do I help a subject who’s totally stiff or camera-shy?
Start by calling them to move: walk, twist shoulders, shake hands. Make them laugh or talk—break tension. Then dip into gentle posing when you see them relax with simple posing tips to help beginners capture natural, confident portraits.
2. Should I dictate every pose or let them suggest?
Mix both. Provide direction, but invite their input. If they want a hand on cheek or lean into something, let them suggest. Their comfort builds a better result.
3. What do I do when a subject complains “I hate my arms / legs / chin”?
Empathize and guide: “We can adjust that—bring your arm a bit forward,” or “slightly lower your head just an inch.” Show them in the camera (or preview) that it does improve. Visual feedback helps trust.
4. How many poses should I aim for in a short session (say 20 min)?
Aim for 5–8 strong variations: full body, seated, leaning, headshots, some movement. Quality over quantity.
5. Can these posing tips be used with natural light, flash, studio, outdoor?
Absolutely. These techniques are about form and communication, not lighting. Whether you shoot in sunlight, window light, or studio, these posing foundations still apply and help your subject look confident in any setting.
Further photo tips here:
Leading Lines Photography: Mastering the Art of Visual Direction


